(A) SUBSTRATE PREPARATION - FLOOR
- The ground is to be watered and rammed thoroughly to create a firm base.
- Over this 3” of river sand is to be laid and rammed thoroughly.
- On top
of the sand cushion, for pedestrian traffic, 4” of 1:5:10 brick
jelly concreting has to be done. For heavy traffic, 4” of 1:4:8
PCC concreting to be done.
(B) FLOOR TILES LAYING
- Prepare base mortar with cement and sand in the ratio 1:4.
- The total mortar thickness should not be more than 1”. In case where tiling is to be done on RCC slabs, finished floor levels would have to be marked using tube levels. In this process, if it is observed in some areas mortar thickness is likely to be in excess of 1”, in those areas PCC work will have to be done to raise levels, so that mortar thickness is not more than 1”.
- Set the levels for the finished floor (i.e., dead level or slope as specified by the Architect / Contractor).
- Prepare cement slurry (i.e. mixture of cement and water to form a thick paste) and spread it on the levelled base mortar.
- Wet the reverse of the tile with water. Complete immersion of tile in water is not required.
- If tiles are square or rectangular in shape, set the right angles for the rooms and place the first tile along the right angle lines and place it on base mortar. Tap gently and uniformly only with a rubber or wooden mallet covered with cloth to obtain perfect levels.
- Clean the surface of the tile with a wet sponge immediately after laying. Ensure that the base mortar cement which squeezes through joints does not settle on the tile. Also ensure that the water used is clean and not salty, hard or brackish.
- It is suggested to leave a fine gap of 1mm all round for external tiles like Regalia, Aquarius, etc. for fast and proper laying.
- For
the tiles like Macedonia, Marmara, Basel and Magnifique, offset
laying shall be followed.
a) While placing Macedonia, a groove of 6-8 mm must be left all around the tile.
b) In the case of Basel, the second tile should be placed exactly at the bottom of the first diamond and ensure the grooves match perfectly.
c) Likewise, when following offset laying for Magnifique, Marmara the second tile should be placed exactly at the mid point of the other tile.
d) For Napoli & Figaro it is recommended that it be laid with Senora or if laid by itself, then to follow offfset laying pattern.
- For external tiling completely open to sky, the tiles should be laid in such a way that for every 10’x10’ area laid, there should be an expansion gap of 2mm on all sides. This should be followed throughout the area of laying, to provide for the expansion, for all tiles. Absence of expansion gaps may result in lifting / chipping / cracking of tiles.
- In site where multiple levels are encountered, the tiles on the ridge will have to be adequately protected with mortar cushion.
- When large span tiles are laid on curved substrate, it is suggested that the tiles be cut to take the contour of the slope ensuring proper bedding.
- Fill in the joints with pointing material which is a mixture of white cement and desired colour of pigment. To arrive at the desired colour/shade, mix the same with water to form a smooth paste which should be applied to the joints preferably with the use of rubber squeeze or rubber sheet. For higher quality of finishes, you could use, if required, a polymer based cementitious tiling joint filler. Do not apply the pointing material all over the tile surface.
- Allow pointing material to set, for 15 minutes and then clean the surface of the tile with wet sponge, removing the excess pigment on the tile surface.
- Wash the surface with soap water or mild detergent to obtain a clean surface.
- Do not use the area laid for 3 days for pedestrian traffic areas 7 days for light traffic areas and 10 days for heavy traffic areas.
- Ensure adequate roughage on the wall before application of mortar, especially if it is an already painted wall, which is to be tiled now.
- Plaster the surface to be tiled with mortar (cement and sand ratio 1:3).
- Prepare cement slurry (i.e. mixture of cement and water to form a thick paste) and spread it on the reverse of the tile after wetting the tile with sponge.
- Instructions given for floor against S. Nos. 5, 6, 7, 10, 12, 13, 14 & 15 of floor tiles laying should be followed.
Stacking Guidelines
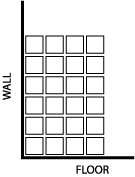
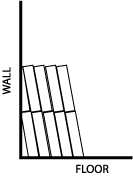
1. All fully covered closed boxes like Monolisa and other closed tile boxes to be stacked horizontally only, upto a height of 6 boxes one on top of the other.


(a) If Mosaic / Marble / any other natural stone which needs machining and polishing is being used in any other part of your floor, it is necessary that this work is completed
(b) Ceiling final coat of paint, all electrical, civil and carpentry works should be completed.
Product
Range: . Landscape
Areas . Driveways . Sitouts
. Corridors . Swimming
Pool Deck
. Foyer Areas . Internal Floors . Walkways . Wall Cladding . Roof Tile . Compound Wall . Staircase Wall . Stairways . Skirting
. Foyer Areas . Internal Floors . Walkways . Wall Cladding . Roof Tile . Compound Wall . Staircase Wall . Stairways . Skirting
New Products - Rustiques . Facilini . Scudo . GFRC & Speciality Flooring